Custom Receipt Printing
With the release of the Android SDK version 2.56, you can customize the layout of printed merchant and customer receipts for the Default UI by using the
UIConfiguration
object. This feature is supported for printed receipts only. If you do not override (customize) the receipt creation, the default, ready-made receipt is used. You can use a convenient transaction object such as
.addParagraph("amount is :" + transaction.getAmount())
to get the data for your receipt. The builder you create using PrintLayoutFactory.Builder()
enables you to add whole sections inside your receipt such as transaction information, merchant information or clearing details. These methods are available in the builder after you call forReceipt()
with a correctly configured receipt, provided by the transaction object. See information about using PrintLayoutFactory.Builder methods to configure custom receipts here. A Kotlin code example using
.forReceipt(transaction.merchantReceipt)
and a Java code example using .forReceipt(transaction.getMerchantReceipt()) )
are shown below. Kotlin
val paybutton2 = create(
    activity,
    configuration.merchant.providerMode,
    configuration.merchant.identifier,
    configuration.merchant.secret
)

val paybuttonConfiguration = UiConfiguration.Builder()
    .paymentOptions(/*...*/)
    .summaryFeatures(/*...*/)
    .customMerchantReceipt { transaction: Transaction ->
        PrintLayoutFactory.Builder()
            .addParagraph("This is Custom Receipt")
            .addParagraph("Welcome to our shop")
            .addImage("/sdcard/Download/logo.png")
            .addParagraph("This is centered", AccessoryPrinter.Align.CENTER)
            .addParagraph("This is right", AccessoryPrinter.Align.RIGHT)
            .addParagraph("This is left", AccessoryPrinter.Align.LEFT)
            .addLabelValue("Date", "12.12.2020")
            .addLabelValue("Time", "13:55")
            .addParagraph("amount is :" + transaction.amount)
            .forReceipt(transaction.merchantReceipt)
            .addMerchantInfo()
            .addClearingDetails()
            .addEject()
            .build()
    }
    .build()

paybutton2.configuration = paybuttonConfiguration
Java
io.mpos.paybutton.MposUi paybutton2 = io.mpos.paybutton.MposUi.create(
    activity,
    configuration.getMerchant().getProviderMode(),
    configuration.getMerchant().getIdentifier(),
    configuration.getMerchant().getSecret()
);

UiConfiguration paybuttonConfiguration = new UiConfiguration.Builder()
    .paymentOptions(/*...*/)
    .summaryFeatures(/*...*/)
    .customMerchantReceipt(
        transaction -> new PrintLayoutFactory.Builder()
            .addParagraph("This is Custom Receipt")
            .addParagraph("Welcome to our shop")
            .addImage("/sdcard/Download/logo.png")
            .addParagraph("This is centered", AccessoryPrinter.Align.CENTER)
            .addParagraph("This is right", AccessoryPrinter.Align.RIGHT)
            .addParagraph("This is left", AccessoryPrinter.Align.LEFT)
            .addLabelValue("Date", "12.12.2020")
            .addLabelValue("Time", "13:55")
            .addParagraph("amount is :" + transaction.getAmount())
            .forReceipt(transaction.getMerchantReceipt())
            .addMerchantInfo()
            .addClearingDetails()
            .addEject()
            .build()
    )
    .build();

paybutton2.setConfiguration(paybuttonConfiguration);
To print custom receipts from the Summary screen use the
Print Merchant Receipt
and Print Customer Receipt
buttons shown below.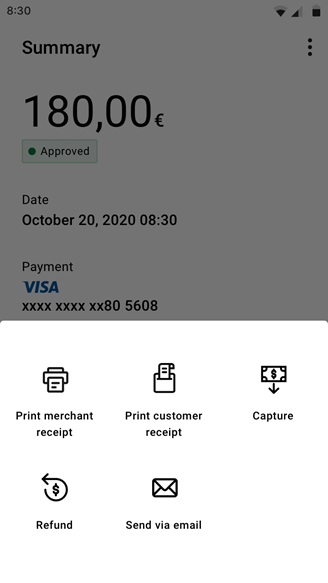
Required Receipt Information
Make sure that your custom receipt contains all of the required receipt information and that you are able to send receipts for successful refunds. A sample receipt with the required information and its placement is shown below. Actual receipt content can vary, depending on acquirer and payment method.
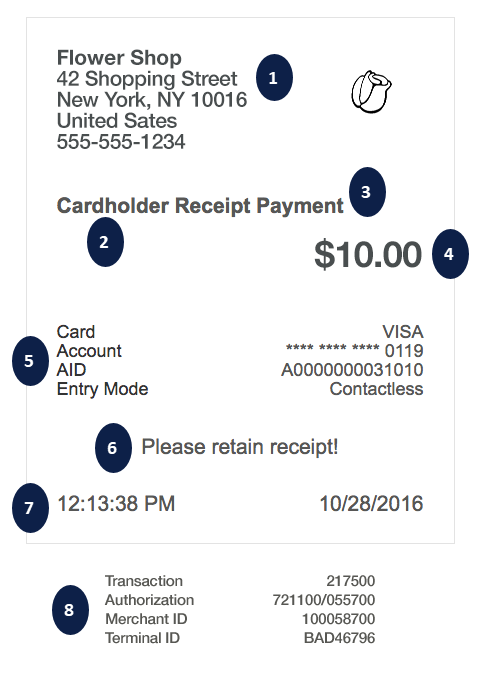
- Full address of the merchant, including the country. Iterate overmerchantDetails, for each line item printvalue.
- receiptType.value
- transactionType.value
- amountAndCurrency.value
- The payment details, e.g. the masked account number. Iterate overpaymentDetails, for each line item print thelabelandvalue.
- statusText.value
- date.valueandtime.value
- The clearing details, e.g. the merchant identifier. Iterate overclearingDetails, for each line item print thelabelandvalue.
- (Not shown) IfprintTipLineistrue, then you must print Tip and Total Amount lines on your receipts.
- (Not shown) IfprintSignatureLineistrue, then you must print a signature line on your merchant receipt.
Including Additional Customized Text on Custom Printed Receipts
You can include customized promotional text or other non-transaction-specific text on your custom printed receipt. Examples of additional text that you might include are a discount coupon for your store or details about an upcoming sales event. Code example for adding custom text are shown below.
Kotlin
// you should reuse the same instance of mposui and not create a new one
val paybutton2 = create(
    activity,
    configuration.merchant.providerMode,
    configuration.merchant.identifier,
    configuration.merchant.secret
)

val paybuttonConfiguration = UiConfiguration.Builder()
    .terminalParameters(accessoryParameters)
    .build()
paybutton2.setConfiguration(paybuttonConfiguration)

// start activity with this intent:
paybutton2.createCustomPrintIntent(
    PrintLayoutFactory.Builder()
        .addParagraph("This is a custom receipt")
        .addParagraph("It can be printed anytime")
        .addParagraph("even without transaction")
        .addEject()
        .build()
)
Java
// you should reuse the same instance of mposui and not create a new one
io.mpos.paybutton.MposUi paybutton2 = io.mpos.paybutton.MposUi.create(
    activity,
    configuration.getMerchant().getProviderMode(),
    configuration.getMerchant().getIdentifier(),
    configuration.getMerchant().getSecret()
);

UiConfiguration paybuttonConfiguration = new UiConfiguration.Builder()
    .terminalParameters(accessoryParameters)
    .build();
paybutton2.setConfiguration(paybuttonConfiguration);

// start activity with this intent:
paybutton2.createCustomPrintIntent(
    new PrintLayoutFactory.Builder()
        .addParagraph("This is a custom receipt")
        .addParagraph("It can be printed anytime")
        .addParagraph("even without transaction")
        .addEject()
        .build()