Integrating Default UI
The Default UI is currently available only for PAX and Miura terminals. To start the basic integration, you must set up your project and module's
build.gradle
files. The integration also requires adding minSdkVersion 21
and compileSdkVersion 29
settings to your build.gradle
files.Setting Up the Project build.gradle
Add the repository to your project's
build.gradle
file.allprojects { repositories { jcenter() maven { url "https://repo.visa.com/mpos-releases/" } } }
Add the Kotlin gradle plugin, which is required in order to use the Default UI.
buildscript {
        ...
        dependencies {
                classpath "com.android.tools.build:gradle:7.0.4"
                classpath "org.jetbrains.kotlin:kotlin-gradle-plugin:1.6.21"
        }
}
Setting Up the Module build.gradle
In the Android section, add these exclusion rules to your module's
build.gradle
file.android { ... packagingOptions { exclude 'META-INF/*' exclude 'LICENSE.txt' exclude 'asm-license.txt' } }
In order for the app to support Java 8 features, set the compatibility levels.
android {

    ...

    compileOptions {
        sourceCompatibility JavaVersion.VERSION_11
        targetCompatibility JavaVersion.VERSION_11
    }
}
The Default UI library publishes a release build type only, so you must add this:
android {

    ...

    buildTypes {
        ...
        debug {
            matchingFallbacks = ['release']
        }
    }
}
Add the libraries to the Dependencies section of your module's
build.gradle
file.dependencies { ... // This is the Default UI dependency implementation 'io.payworks:paybutton-android:2.76.0' // Add this dependency if you want to use Pax card reader implementation 'io.payworks:mpos.android.accessories.pax:2.76.0' // Add this dependency if you want to use Miura card reader implementation 'io.payworks:mpos.java.accessories.miura:2.76.0' // Add this dependency if you want to connect to the Miura via bluetooth implementation 'io.payworks:mpos.android.comlinks.bluetooth:2.76.0' // Add this dependency if you want to connect to the Miura via wifi implementation 'io.payworks:mpos.java.comlinks.tcp:2.76.0' }
Update your
AndroidManifest.xml
file to enable a larger heap size by setting the parameter android:largeHeap="true"
. This setting is required in order to accommodate situations in which an update of the terminals is required, and bigger chunks of data are requested and transferred.<application [...] android:largeHeap="true"> [...] </application>
Enable the necessary permission in the
AndroidManifest.xml
file.<!-- Needed for Default UI !--> <uses-permission android:name="android.permission.INTERNET"/> <uses-permission android:name="android.permission.ACCESS_NETWORK_STATE"/> <uses-permission android:name="android.permission.READ_PHONE_STATE"/> <!-- Needed for Miura integrations !--> <uses-permission android:name="android.permission.BLUETOOTH" /> <uses-permission android:name="android.permission.BLUETOOTH_ADMIN" /> <!-- Needed for Pax integrations !--> <uses-permission android:name="com.pax.permission.ICC"/> <uses-permission android:name="com.pax.permission.PICC"/> <uses-permission android:name="com.pax.permission.MAGCARD"/> <uses-permission android:name="com.pax.permission.PED"/>
Specifying ProGuard Rules
If you are using ProGuard as an obfuscation tool in your app, add these rules for the Default UI.
# Jackson
-keep class com.fasterxml.** { *; }
-dontwarn com.fasterxml.**

# Bolts
-keep class bolts.** { *; }
-dontwarn bolts.**

# Couchbase
-keep class com.couchbase.** { *; }
-dontwarn com.couchbase.**

# OkHttp
-keepattributes Signature
-keepattributes *Annotation*
-dontwarn com.squareup.okhttp.**
-keep class com.squareup.okhttp.* { *; }
-dontwarn okio.**

# Otto
-keepclassmembers class ** {
    @com.squareup.otto.Subscribe public *;
    @com.squareup.otto.Produce public *;
}

# Payworks
-keep class io.mpos.** { *; }
-dontwarn io.mpos.**

#PAX
-dontwarn com.pax.**
-keep class com.pax.** { *; }
Starting a Transaction
To start a transaction, complete the steps listed below.
To start a payment, you must create a new Default UI instance using the
MposUi
object.Kotlin
val mposUi = MposUi.create(
               providerMode = ProviderMode.MOCK,
            merchantId = "yourMerchantIdentifier",
            merchantSecret = "yourMerchantSecret"
        )
Java
MposUi mposUi = MposUi.create(
        ProviderMode.MOCK,
        "yourMerchantIdentifier",
        "yourMerchantSecret");
Configuring Terminal Parameters
You must set the
uiConfiguration
instance with the terminal parameters that you want to use for performing transactions. If these parameters are not set, the MOCK terminal parameters will be used as the default.Kotlin
val configuration = UiConfiguration(
    // For transacting with PAX terminals:
    terminalParameters = AccessoryParameters.Builder(AccessoryFamily.PAX)
        .integrated()
        .build()
    // Use this builder instead if you would like to interact with Miura terminals
    // terminalParameters = AccessoryParameters.Builder(AccessoryFamily.MIURA_MPI)
    //     .bluetooth()
    //     .build()
)
mposUi.configuration = configuration
Java
UiConfiguration configuration = new UiConfiguration.Builder()
        .terminalParameters(
                // For PAX terminals:
                new AccessoryParameters.Builder(AccessoryFamily.PAX)
                        .integrated()
                        .build()

                // Use this builder instead if you would like to interact with Miura terminals
                // new AccessoryParameters.Builder(AccessoryFamily.MIURA_MPI)
                //         .bluetooth()
                //         .build()
        )
        .build();
mposUi.setConfiguration(configuration);
Creating Transaction Parameters
Next, create a
TransactionParameters
instance to specify the transaction type, amount, and currency.Kotlin
val transactionParameters = TransactionParameters.Builder()
            .charge(1.toBigDecimal(), Currency.EUR)
            .build()
Java
TransactionParameters transactionParameters = new TransactionParameters.Builder()
        .charge(new BigDecimal("1.00"), io.mpos.transactions.Currency.EUR)
        .build();
You can include additional parameters such as:
Parameter | Description |
|---|---|
Subject | Subject for transaction. |
Custom Identifier | Optional custom identifier for transaction. |
Auto Capture | Defines whether the transaction should be automatically captured or pre-authorized. Default setting is true |
Meta Data | Set of key-value pairs that can be attached to transaction. |
Workflow | Defines whether transaction should use a point-of sale (POS) credit card workflow or a mail order / telephone order (MOTO) workflow. If more than one payment method is supported, setting the parameter to UNKNOWN triggers the Payment Method Selection screen. The default setting is POS . |
These examples show how to use the additional parameters:
Kotlin
val transactionParameters = TransactionParameters.Builder()
        .charge(BigDecimal("1.00"), Currency.EUR)
        .subject("Bouquet of Flowers")
        .customIdentifier("yourReferenceForTheTransaction")
        .workflow(TransactionWorkflowType.UNKNOWN)
        .subject("Bouquet of Flowers")
        .metadata(
                mapOf(Pair("clerk", "John Doe"), Pair("sale commission", "2%"))
        )
        .build()
Java
TransactionParameters transactionParameters = new TransactionParameters.Builder()
        .charge(new BigDecimal("1.00"), io.mpos.transactions.Currency.EUR)
        .subject("Bouquet of Flowers")
        .customIdentifier("yourReferenceForTheTransaction")
        .workflow(TransactionWorkflowType.UNKNOWN)
        .subject("Bouquet of Flowers")
        .metadata(
                new HashMap<String, String>() {{
                    put("clerk", "John Doe");
                    put("sale commission", "2%");
                }}
        )
        .build();
Retrieving Transaction Intent from MposUi
Next, retrieve the transaction Intent from the
MposUi
object.Kotlin
val transactionIntent = mposUi.createTransactionIntent(transactionParameters)
Java
Intent transactionIntent = mposUi.createTransactionIntent(transactionParameters);
Starting Activity to Initiate the Payment
As the final step, use Android's standard
startActivity
method to initiate the payment flow.Kotlin
startActivityForResult(transactionIntent, MposUi.REQUEST_CODE_PAYMENT)
Java
startActivityForResult(transactionIntent, MposUi.REQUEST_CODE_PAYMENT);
Retrieving the Transaction Result
After the transaction is completed and the Summary screen is dismissed,
onActivityResult
is triggered, returning information about the last transaction.Kotlin
override fun onActivityResult(requestCode: Int, resultCode: Int, data: Intent?) {
    super.onActivityResult(requestCode, resultCode, data)

    if (requestCode == MposUi.REQUEST_CODE_PAYMENT) {
        when (resultCode) {
            // Result code from a successful transaction
            MposUi.RESULT_CODE_APPROVED -> {
                val transactionIdentifier = data?.getStringExtra(MposUi.RESULT_EXTRA_TRANSACTION_IDENTIFIER)
                Toast.makeText(findViewById(android.R.id.content),"Transaction approved!\nIdentifier: $transactionIdentifier", Toast.LENGTH_LONG).show()
            }
            // Result code from a declined, aborted or failed transaction
            MposUi.RESULT_CODE_FAILED -> {
                Toast.makeText(findViewById(android.R.id.content), "Transaction was declined, aborted, or failed", Toast.LENGTH_LONG).show()
            }
        }
    }
}
Java
@Override
protected void onActivityResult(int requestCode, int resultCode, Intent data) {
    super.onActivityResult(requestCode, resultCode, data);

    if (requestCode == MposUi.REQUEST_CODE_PAYMENT) {
        if (resultCode == MposUi.RESULT_CODE_APPROVED) {
            // Transaction was approved
            String transactionIdentifier = data.getStringExtra(MposUi.RESULT_EXTRA_TRANSACTION_IDENTIFIER);
            Toast.makeText(this, "Transaction approved, identifier: " + transactionIdentifier, Toast.LENGTH_LONG).show();
        } else {
            // Card was declined, or transaction was aborted, or failed
            // (e.g. no internet or accessory not found)
            Toast.makeText(this, "Transaction was declined, aborted, or failed",
                    Toast.LENGTH_LONG).show();
        }
    }
}
Integrators who require more transaction information, such as the masked account number, can get this information by querying the full transaction object. This query can be done by calling one of these methods:
Kotlin
val latestTransaction = mposUi.latestTransaction
Java
Transaction latestTransaction = mposUi.getLatestTransaction();
Loading Merchant Data from Your Backend
At this point, the
merchantIdentifier
and merchantSecret
values are hardcoded so that all payments are routed to a single merchant. For a live solution, you might want to support multiple merchants, such as two restaurants, to route the payment correctly. To support multiple merchants, store this data on your backend: - merchantIdentifierandmerchantSecretvalues, which identify the merchant to which the payment is routed. You can create new merchants and get their credentials in the Gateway Manager.
- Whether the merchant is a TEST or LIVE merchant.
- The card reader model that the merchant uses.
You can then fetch this data before starting a transaction and configure the
MposUi
object accordingly. See Creating a Default UI Instance.Capturing the Signature
When a transaction requires the customer's signature, the customer is prompted to sign on the touchscreen interface. This method is the default setting for capturing signatures.
If the merchant prefers to capture signatures on printed receipts, modify the
UiConfiguration
object to enable this signature capture method.Kotlin
val configuration = UiConfiguration(signatureCapture = SignatureCapture.ON_RECEIPT)
mposUi.configuration = configuration
Java
UiConfiguration configuration = new UiConfiguration.Builder()
        .signatureCapture(UiConfiguration.SignatureCapture.ON_RECEIPT)
        .build();

mposUi.setConfiguration(configuration);
Enabling Accessibility Mode provides visually impaired customers with voice-over instructions during the payment transaction. The instructions guide the customer through presenting the payment card or entering the PIN on the touchscreen display of the payment terminal.
The Accessibility Mode option is enabled in the
UiConfiguration
object. After this option is enabled, a new icon displays on the Present Card screen of the payment terminal. Tapping the icon activates the voice-over instructions. This option complies with the Royal National Institute of Blind People guidelines.Kotlin
val configuration = UiConfiguration(accessibilityModeOption = AccessibilityModeOption.OPTION_VISIBLE)
mposUi.configuration = configuration
Java
UiConfiguration configuration = new UiConfiguration.Builder()
        .accessibilityModeOption(UiConfiguration.AccessibilityModeOption.OPTION_VISIBLE)
        .build();

      mposUi.setConfiguration(configuration);
Enabling TalkBack Accessibility Service
The Default UI supports the TalkBack accessibility service, which is the screen reader for Android devices. The screen reader describes and reads aloud information displayed on the screen to assist visually impaired individuals.
The process used to enable the TalkBack accessibility service on Android devices might vary by the device type and the Android version on the device.
To enable the Talkback service on an Android devices:
- Open theSettingsapplication.
- SelectAccessibility.
- From the list, selectTalkBack.
- Slide the Use TalkBack switch toOn.
After Talkback is enabled, the screen reader will read and describe aloud what is displayed on the device. For more information about using TalkBack, see Android Accessibility Help.
Enabling the Talkback Service on PAX Devices
Some payment terminals, such as the PAX A920, do not come with the Talkback service installed.
To add the Talkback accessibliity service to PAX devices:
- Open thePAXSTOREapplication on your device.
- Search for "Visa Accessibility Service."If you cannot find "Visa Accessibility Service" in PAXSTORE, contact Customer Support. Include the serial number of the device to which you want to add the "Visa Accessibility Service."
- If you locate the Visa Accessibility Service in PAXSTORE, follow the prompts to install the application on your device.After installation is complete, the Talkback service will be included in your Accessibility settings. You can then enable this service on your Android device.When using a PAX device, you might be asked for a password while opening your Settings application. A list of default passwords is available here.
Customizing Available Payment Options
By default, the Default UI accepts CARD as a payment option. If you want to accept other payment options, such as mail order / telephone order (MOTO), you can use the
setConfiguration
value to enable available options.Kotlin
val configuration = UiConfiguration(paymentOptions = setOf(PaymentOption.CARD, PaymentOption.MOTO))
mposUi.configuration = configuration
Java
UiConfiguration configuration = new UiConfiguration.Builder()
        .paymentOptions(
                EnumSet.of(
                    UiConfiguration.PaymentOption.CARD,
                    UiConfiguration.PaymentOption.MOTO
                )
        )
        .build();
mposUi.setConfiguration(configuration);
When setting these payment options and starting a new transaction with
UNKNOWN
workflow type in the transaction parameters, the Payment Option screen displays, as shown below. On this screen, you can select a payment option (CARD
or MOTO
in the example) to start the payment process. The Alternative Payment Method and Gift Card payment options are not yet supported.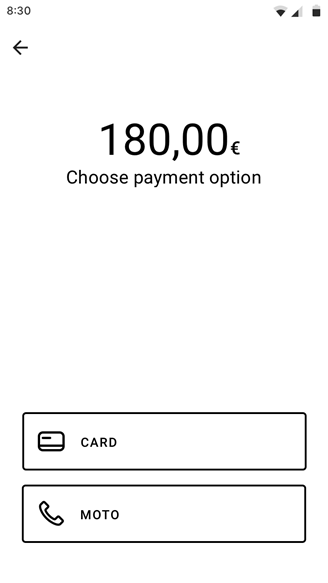
Related Links